Sourdough Primer: Step by Step (with Pictures!) Guide to Making Sourdough
- Carlos Cruz-Abrams
- Feb 14, 2024
- 6 min read
UPDATED FEBRUARY 2024:
As an East Coaster by birth, the idea of sourdough evokes pictures of cable cars and the hills of San Francisco. But I have always loved that tang of sourdough bread, and now that I live West of the Mississippi, it seems like sourdough should be something I can handle. So, like many of you, during the pandemic I set about creating my own sourdough starter. I used The King Arthur Flour Baker's Companion (TKAFBC) recipe and instructions (highly recommend) and lo and behold, approximately 7 days later, Pierre, our sourdough starter was born! Like any 4-year old, Pierre is pretty active every day -- sometimes he lives in the fridge and we feed him less, sometimes he lives on the counter and we feed him more (depends on when we want to make more sourdough). In any event, Pierre has been very busy helping me really dive into sourdough baking in the last 4 years -- Pain au Levain, Whole Wheat Pain au Levain, Rosemary Olive Oil Loaves, Challah, Biscuits, Pancakes...the list goes on. Friends often ask for recipes for their own sourdough adventures, so I thought that a step-by-step recipe might be the best bet, with pictures of each step to help even the most timid bakers along the way. So here goes -- this is a basic Pain au Levain Recipe (adapted from TKAFBC Pain au Levain recipe).
SIDE NOTE ON REFRESHING OR MAKING MORE STARTER: If you need to refresh your sourdough or make more, it's really simple. In a container that is big enough (I use resealable glass jars) mix about 1 tablespoon of starter (don't use ALL of your starter when you make bread, reserve a little to make more starter) with 8.5 ounces of lukewarm water (this is how I end up with extra -- if a recipe calls for 16 ounces of sourdough starter, I make 17 ounces each time so I have an ounce left to make the next batch). Once that is mixed, add in 8.5 ounces of white all-purpose flour. Mix throughly, close the container and let it sit on your counter until you see some good bubbles forming on the sides (this takes anywhere from a couple of hours to 4-5 hours depending on how cold your kitchen is). At that point I usually move it into my fridge where it can stay up to a week until the next time I use my sourdough starter and do it all again. If you don't want to refrigerate, that's fine, but note that you should feed sourdough starter every day to keep it fresh if not refrigerated. To feed it, discard about 16 ounces, then follow the directions at the start of this paragraph to do it all again. Google "Sourdough Discard Recipes" for some great ideas on things to make using that discard.
RECIPE TIMETABLE (Assuming you have a ready-to-go starter)
Step 1: Mix Ingredients (5 minutes)
Step 2: Autolyse (20 minutes)
Step 3: Add Salt and Knead (8 minutes)
Step 4: First Rise (1 Hour)
Step 5: Fold (5 minutes)
Step 6: Second Rise (1 Hour)
Step 7: Divide into two balls (2 minutes)
Step 8: Let dough rest (20 minutes)
Step 9: Form two balls and put into proofing bowls (15 minutes)
Step 10: Third (and final) rise (2 hours)
Step 11: Bake with steam (not hard, explained below) (20 minutes)
Step 12: Bake without steam (25 minutes)
TOTAL TIME: Approximately 6 hours (of which 4 hours and 40 minutes is rising/resting time and 45 minutes is baking time -- so active time of 35 minutes)
INGREDIENTS:
2 and 1/2 cups (1 lb.) Sourdough Starter (if you can weigh it, that is best since volume of sourdough starter varies)
5 cups (1lb. 5 oz.) all purpose flour (unbleached, or bleached. I also sometimes use white whole wheat flour and have even used bread flour -- it's all pretty forgiving)
2/3 cup (3 oz.) whole wheat flour (if you use white wholewheat above, just use that for this step too)
1 and 3/4 cup (14 oz.) water
2 and 1/2 teaspoons salt
STEP 1:
In a large bowl mix together the Sourdough Starter, Flour(s) and water.

First, 2.5 cups (16 ounces) of Sourdough Starter

Next, 5 cups (1 lb. 5 oz) all purpose flour plus 2/3 cup (3 oz) whole wheat flour -- total 24 ounces flour.

Finally, 1 and 3/4 cups (14 ounces) water.
MIX (I used a wooden spoon to start and then my hands to get it thoroughly mixed) until mixed but NOT smooth.


STEP 2:
Your dough will be raggedy and sticky. That's okay. Now cover (I typically use plastic wrap or a silicone baking sheet as cover) and let it sit for 20 minutes. This stage is called the "autolyse" (which allows the natural enzymes to untangle the gluten and make less mixing necessary to develop your dough. Salt comes AFTER the autolyse.
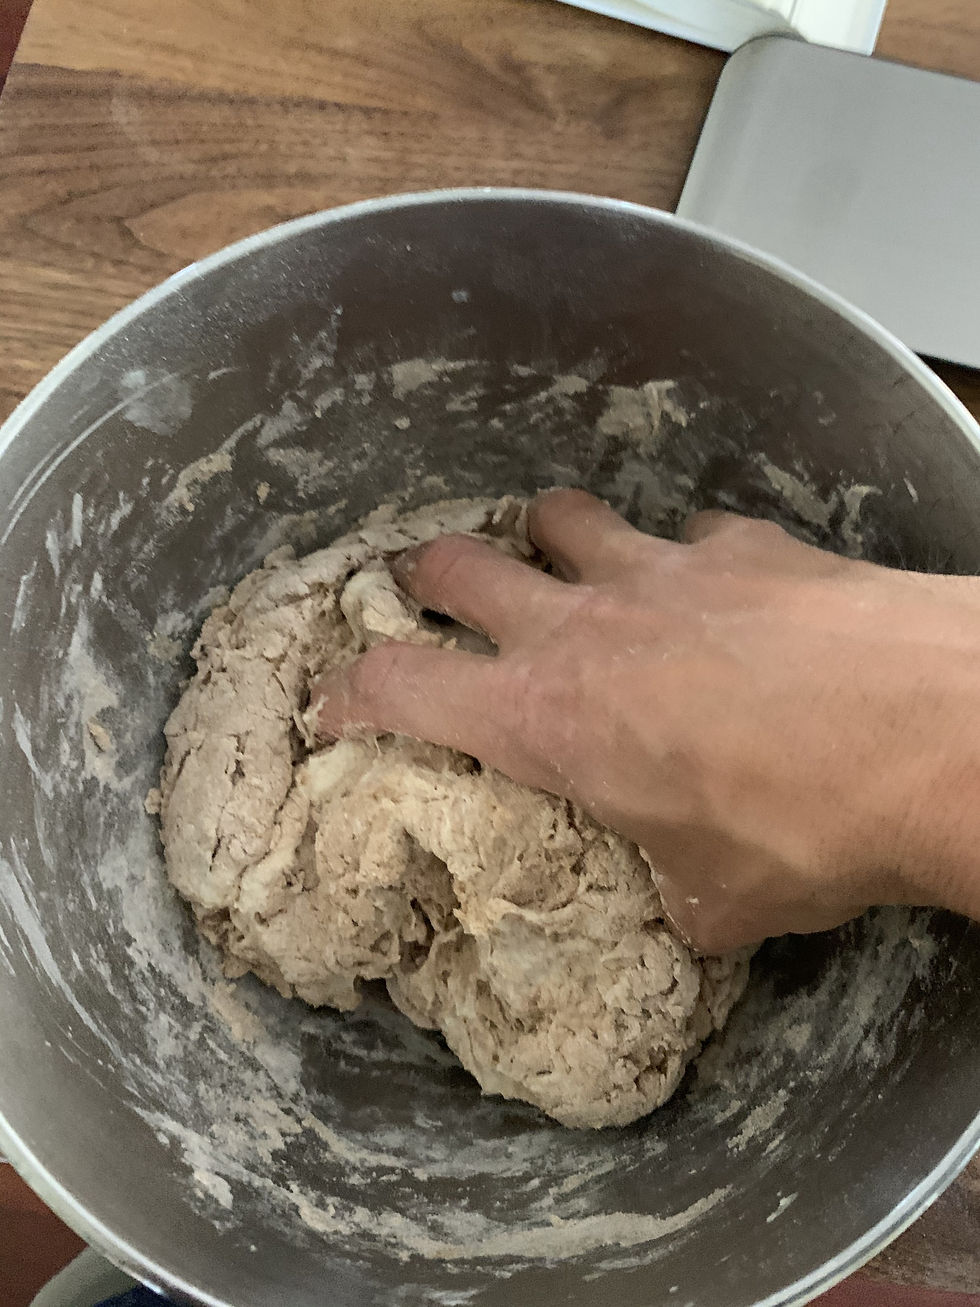
STEP 3:
Add Salt (2.5 teaspoons) and knead. I find that the dough tends to be pretty raggedy and wet so I just knead in the bowl/above the bowl -- learned the hard way that kneading on the counter at this stage did not work. It is HARD to do at first because it is so sticky, but remember that a slicker dough will create a lighter loaf so DO NOT ADD MORE FLOUR. Note that the picture below was for a whole wheat loaf, which tends to be drier, which is why it looks firm. TRUST ME -- if you are doing this right, it will be much stickier than the below picture lets on.

STEP 4:
Put back into the bowl and let proof. I usually put it in the oven on the proof setting (at 90 degrees) or by the fireplace. Sourdough LOVES warmth, but not heat, so keep it warm but don't cook it. Let rise for 1 hour.

Step 5:
Prepare your counter with a light dusting of flour. Turn the dough out onto the counter GENTLY. You will form it into a rectangle (again gently). Now fold it like an envelope -- first the bottom folds halfway up, then the top folds down over. Then the right side folds halfway over toward the left and then finally the left folds over toward the right. This is all very gentle and you will see that the dough is a lot firmer after you fold. Put it back into the bowl and cover.

Prepare the counter surface. Here I used a silicon pastry mat on the counter that I dusted with flour.

Make the dough into a rectangle.

Fold the bottom up.

Fold the top down.

Fold the right side over.

Finally fold the left side over.

STEP 6:
Re-cover the bowl and let it rise (same note on warmth as above) for another hour.
STEP 7:
Take the dough back out of the bowl and put it onto your prepared counter. Cut the dough in half and then form two loose balls.

STEP 8:
Cover with a kitchen towel and let sit for 20 minutes until they've puffed up a little bit.


See how they kind of poofed up together here?
STEP 9:
Gather up each ball into a tighter and firmer ball. To do this you continuously pull the top of the dough toward you with your fingers while using your thumbs to roll the ball away from you (see the picture) -- you are gathering the "extra dough" into a seam at the top and making the dough overall into a tighter ball.

STEP 10:
Line a small-ish mixing bowl with a kitchen towel. Spread a little bit of flour on the towel (so that the dough won't stick to it once you put the dough in). Place the rolled dough ball, seam side up, into the bowl and then cover with the remainder of the towel. Don't forget to put a little flour on the top so it won't stick to the towel either.


STEP 10:
Let the two dough balls in their separate bowls rise for another 2 hours total. BUT after 1.25 hours preheat your oven to 450 degrees. In your oven, if you have a pizza stone, preheat it with the stone. If you don't, just put a baking sheet in the oven (on the middle rack). On the rack below that put an empty baking sheet (one that has sides that you will be able to pour water into later).
STEP 11:
Take each of the loaves (that's right, the dough balls are now loaves!) gently out of their bowls and place them onto a baking sheet with parchment paper. If you're like me and don't have a razor blade handy or sharp enough knives, take your sharpest paring knife and make three slashes on the top of the each loaf. Place both loaves side by side on your pre-heated pizza stone/baking sheet and then pour some water into the baking sheet on the lower rack and close the door quickly. This will create a steamy over for the first part of the bake (giving your bread a nice crusty crust). Careful when you pour because you will get steam immediately! Bake for 25 minutes.


(You can see I spilled a little water on the door of the oven when I poured it in -- no biggie).
STEP 12:
Open the oven door and take out the lower baking sheet (the one with water) and then close the door again. You want to bake without steam for the last bit so that you do not have a tough crust. Bake for another 20-25 minutes until golden brown (see the picture).

Take it out, put it on a rack and let it cool. ENJOY!!


Comments