Challah! (Step by Step Instructions plus pictures and videos)
- Carlos Cruz-Abrams
- Mar 2, 2024
- 9 min read
Updated: Mar 3, 2024
I love Fridays. Not only are they the end of the workweek, but they are the start of the most special 24 hours of the entire week - Shabbat! A mandated rest day from on high spent with family and good food - yes please. But my favorite part, hands down, is the challah. That soft, pillowy, slightly sweet, golden deliciousness that is braided like the hair of the Sabbath Bride and that we bless at dinner, then rip into and devour, with hopefully enough leftover for challah french toast the next day. I also love MAKING the challah, and as of this writing am well over a thousand loaves in (though I have at least one friend who has more than 5X that expertise, so if you're really stuck and you can't find me, go find Shereen).
Contrary to popular belief, challah is actually a really easy bread to make. As an enriched bread (meaning it is not just flour, water, salt and leavening, but also has eggs, oil and sugar), it is pliable and easy to work with. You can, for this recipe be "precise" (versus most baking recipes where you must be PRECISE in all shouty caps). It is forgiving. Too dry, add more water. Too wet, add more flour. Not sweet enough, add more sugar. Want it less sweet...well, you get the gist. So every Friday when I have access to a kitchen I make challah for my family (and sometimes our congregation) - and I want to make sure you know how to do it too. Below is my step-by-step recipe, with pictures, for making challah. For these pictures, I used 1/2 whole wheat and 1/2 bread flour. You can do all bread flour (you may find you need between 1/4 cup and 1/2 cup more depending on whether your dough still seems too sticky to be bread dough). You can do all whole wheat flour (you may find you actually need less flour - 5 cups - and still a little more water to give the dough that wet space to rise and bake and leave air bubbles for the fluffy challah of your dreams. Remember, it's forgiving. And I have made this recipe at sea level (less flour) and at 10,000 feet (the recipe below since that's around my normal baking height). Get baking!
Ingredients
Between 5 and 6 cups of bread flour, whole wheat flour, or a mix of the two - note you can use All-purpose flour if you want, it just won't be as fluffy as bread flour (but likely more fluffy than whole wheat!)
1/3 cup sugar plus 1/2 teaspoon (for feeding the yeast)
1 tbsp. salt
1 1/4 cups warm (not hot) water - if it feels like bathwater temperature, you're good
2 packets of yeast (which is 1.5 tbsp of yeast if you have it in bulk) - doesn't matter if its quick rise, rapid rise, or regular old yeast
1/4 cup olive oil (other people use more and different oils, I like this amount of olive oil), plus some for oiling the bowl for the first rise
3 eggs (2 for the dough, one for an egg wash right before baking)
For topping your challah - flaky salt, poppy seeds, sesame seeds, everything seasoning...you name it - this is your challah after all.


Baking Instructions
Step 1 - proofing the yeast: Add the 1/2 tsp. of sugar to the water and add in the yeast. Stir lightly until the yeast is mixed in then let it sit. It takes a few minutes for the yeast to proof. What does that mean? It means that the yeast gets a little foamy and has some bubbles releasing. Picture below. If your yeast does not proof, start over after about 10 minutes with new yeast and water and sugar. Make sure your water is not too hot (not scalding) or too cold (brr). Remember yeast is alive and wants to be comfy and eating sugar. Don't we all? Now look at step 2, which you can do while waiting for the yeast to proof.


Step 2 - first dry ingredients in: In the main mixing bowl, add in 1.5 cups flour, 1/3 cup sugar and 1 tbsp. salt. Mix well. Wait for the yeast to proof.
Note on measuring flour: This recipe assumes you are measuring flour the same way I am. I do a modified sifting method when I measure flour -- I use two dry measuring cups (as opposed to liquid measuring cups) and scoop up flour with one and then drop it into the other. This keeps the flour from being too compacted (versus scooping up with a single measuring cup and then flattening the top with a knife, which gives you more flour overall - so keep that in mind in Step 5 below) and essentially sifts it. I still use a knife to make the top flat once I have added enough flour into the cup. See picture below for my "sifting" method.


Step 3 - add yeast and oil to dry: Once the yeast is proofed, add the yeasty water into the dry ingredients in the mixing bowl and also add the 1/4 cup olive oil (note that I measure the oil in the same measuring cup where the yeasty water was - it's all about to get mixed anyways) - you can even add in the oil to the yeast and water AFTER proofing and then add all of that into the dry ingredients.. Mix well! I prefer to whisk this part to make it nice and smooth like pancake batter. You can stir if you want with a spoon. You can also use the whisk attachment on your stand mixer.


Step 4 - eggs, more flour, more whisking: Add two eggs (no need to pre-whisk them) and another cup of flour to the mixing bowl. Whisk/stir again until fully incorporated. Again, you can use the stand mixer with the whisk attachment.


Step 5 - rest of the flour, mix, mix, mix: Add 2 cups of flour to the dough and switch to either a wooden spoon (if you're doing this by hand) or the dough hook (if you are using a stand mixer). Now mix, mix, mix. The goal here is to have all of the flour incorporated and get to a nice pliable and slightly tacky (but not sticky) dough.
Pro tip: If you still have dry flour and the spoon isn't doing the job, start using your hands. You can knead directly IN the mixing bowl. You want all of the flour to be incorporated. If you TRULY cannot get it in, add a tbsp. of water and keep mixing. Repeat as necessary but remember that you have to mix a lot for the flour to absorb the water throughly into the dough so don't be fooled just because the water seems to disappear. KEEP MIXING.
NOTE: If you are making 100% bread flour or 1/2 bread flour 1/2 whole wheat flour challah - you will add in another 1/2 cup of flour either at the beginning of Step 5 or in the middle if you find the dough is still really sticky and ragged. If you keep mixing/kneading and the dough is still stick and ragged, add another 1/4 cup flour and mix/knead more. If it is STILL ragged and too sticky, add one more 1/4 cup of flour in (very unlikely for anything with whole wheat in it and also very unlikely in dry climates) and mix/knead.
How do I know when I am done mixing/kneading? When the dough is able to be easily formed into a ball with your hands. See picture in slideshow below.


Step 6 - first rise: You took the dough out of the bowl and made a ball (yay). Now add some olive oil (about a teaspoon) and then rub it all over the inside of the bowl. Put the ball in and swish it around so the ball is all covered with the oil. Now cover the bowl (ideally with something impermeable, I use silicon covers, you can use plastic wrap, a silicon baking mat, whatever you want - I know people who use shower caps and even swim caps!) and let the dough rise somewhere that is not too cold (I usually put mine in the oven on the "proof" setting) for anywhere from 1-3 hours (depends on weather, humidity and altitude) until the dough is roughly double in size. If you get to 3 hours and it isn't double, don't sweat it. Move to the next step anyways and trust me, it will work out okay.


Step 7 - beat down, cut-up: On a lightly floured surface (I highly recommend a silicon baking mat) dump the now-risen dough out of the mixing bowl. Shape it into a circular shape (you don't have to knead it, just kind of push it into a fairly even circle) that you can then slice into 6 even pieces. If they aren't totally even, you'll live.


Step 8 - roll and braid: Take each piece one at a time and roll it into a log about 10-12 inches long. I literally pick up each piece and roll it between my hands like playdough. I try to have them be around the same length and within each log, about the same thickness throughout. Basically, playdough snakes. Now, take three braids and lay them side by side. Starting in the middle, braid the right outside strand over the middle strand, then braid what is now the middle strand (the strand formerly known as the right outside strand) over the left outside strand. Now braid the middle strand (the strand formerly known as the left outside strand) over the right outside strand. See pictures below. This is a simple three strand braid. Like hair or string in art class. No fancy braids in this recipe. Braid the to end of the strands then when you can't really braid them anymore, slightly mush them together and tuck them under the bread so it looks nice. Then do the exact same thing on the other half of the loaf, braiding out from the middle again and finishing the end the same way. Repeat with your other three pieces of bread and you will have two braided challah loaves. Videos and pictures below.


Step 9 - second rise and oven pre-heat, bring that third egg to room temperature: Put the two braided loaves on the sheet where you will bake them (I use a perforated cookie sheet with a silicon mat OR just a solid cookie sheet with no mat). Cover them with a tea towel and let them rise somewhere not too cold. While they are rising, pre-heat your oven to 375 degrees. Also take the third egg out of the fridge if it was in there - we want it to be room temperature for the egg wash.

Note about rising times: At altitude, I find that this second rise only typically needs to be about as long as it takes my oven to pre-heat - if your oven heats very quickly, then 20-30 minutes. You want the dough to basically start to poof but not poof TOO much or it will collapse. Most people whose challah ended up too dense over-proofed at this stage and their challah collapsed while baking. I would always err on the side of under-proofing than over-proofing for this second rise. Note that at sea level or under 5,000 feet generally you may need some more time for this rise - but never more than an hour. Just trust me.
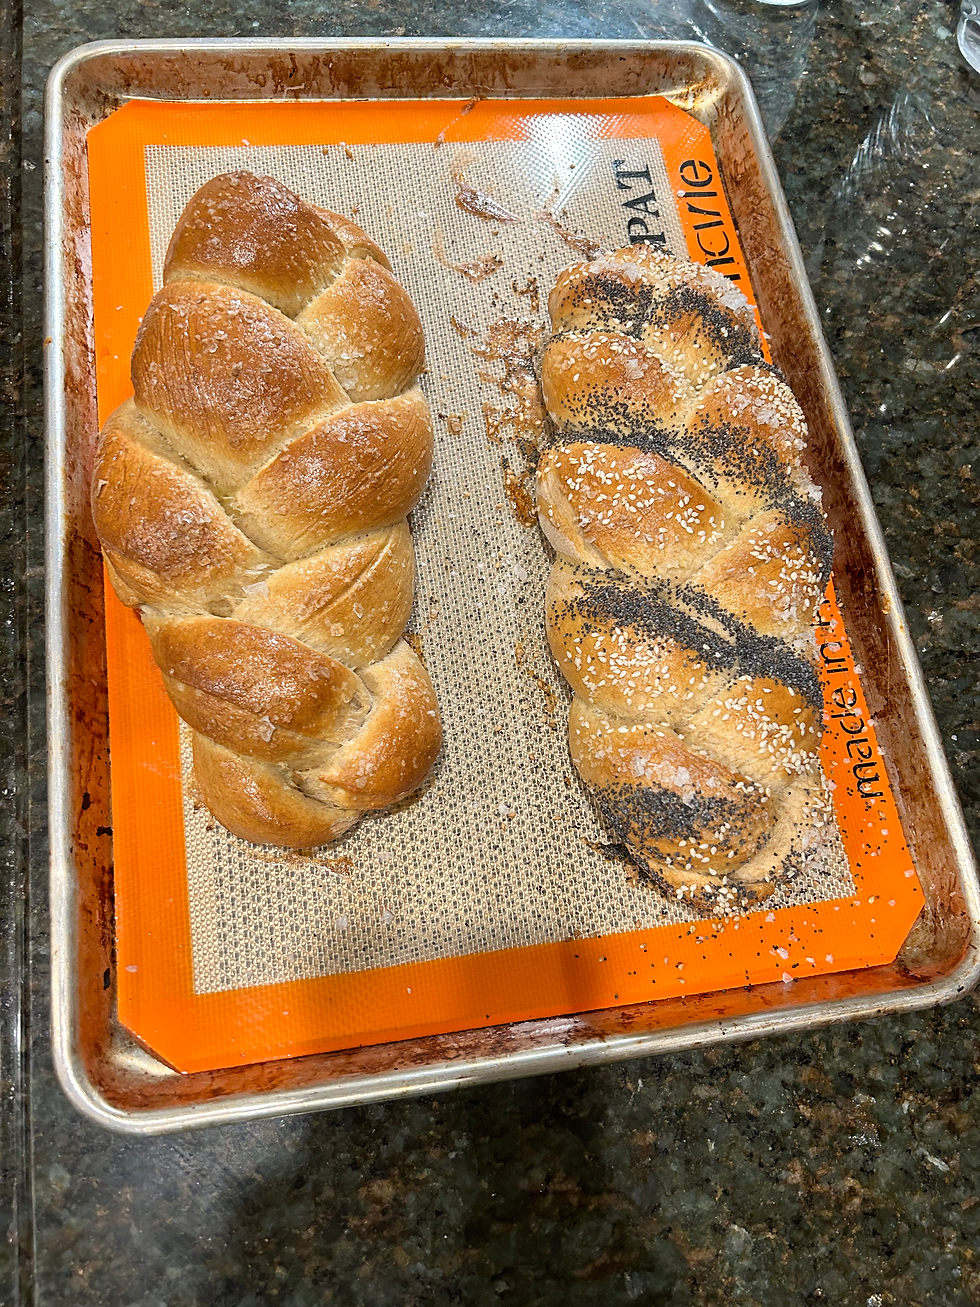
Step 10 - egg wash and toppings, then BAKE: While the bread is rising, crack that last egg into a small cup and add about 1 tsp of warm water (not hot, don't curdle the egg). Mix it well (think scrambled eggs). Once the dough is risen, you will brush the egg wash all over the tops and sides of the loaves. Really give it a good cover. Then you can sprinkle on whatever topping (if any) you want. I typically make one flaky salt loaf and one fun loaf with sesame, poppy seeds and salt sprinkled in stripes. Now pop the baking sheet into the oven (middle rack) and bake for about 25 minutes.


Note on baking times: You know your oven, I don't. What I know is that you want your challah to be nice and golden brown all over (no worries if it expands, it should, and the space between the brown on top of the braids is more golden yellow - that's just part of the baking rise and since that part was not egg washed as it was still the inside of the dough when you started baking, it will not get as dark and golden brown. I recommend turning your baking sheet around 1/2 through the bake. My top oven takes 28-30 minutes to bake and my bottom one takes 22-25 minutes. Go figure. You'll know what to do.
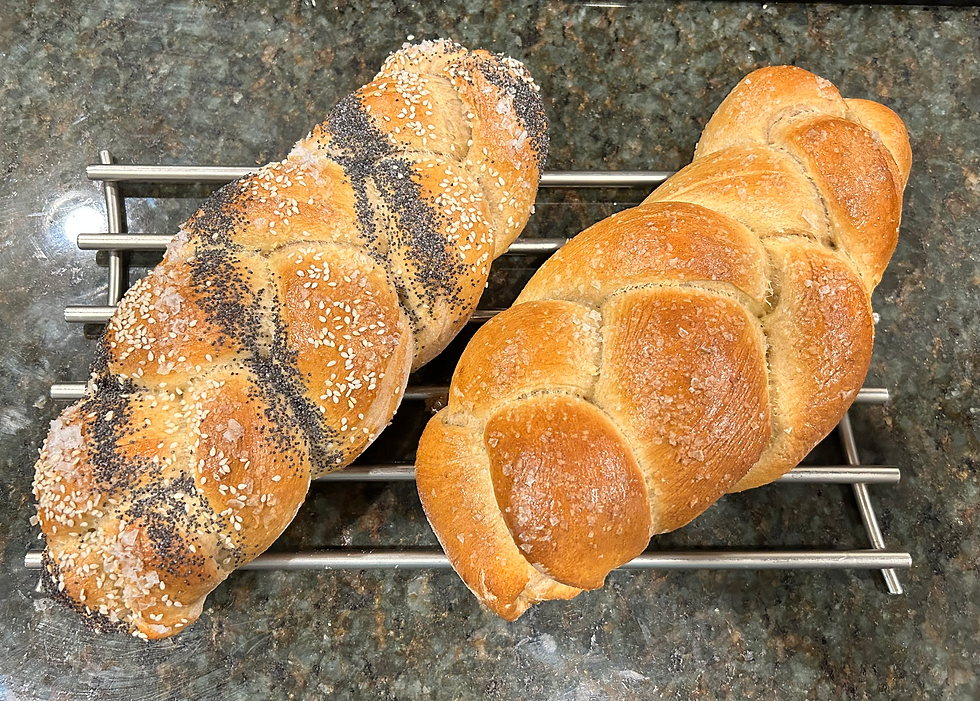
Step 11 - cool, bless and eat: I know you want to, but let the bread cool before you eat it. Bread continues to bake a little on the inside while it cools and if you cut it too early, it will be dense and not as fluffy as you want. I typically cool for an hour before eating (or more). If blessing the challah is your thing, go for it. Now, slice that challah and eat it up. If you don't finish the challah, you can store it over night (typically it will last for about 3 days max if you leave it in a plastic bag, bread box or some other storage thing at room temperature). You can also freeze a fully cooled challah and it is good for a long time! When you are ready to eat it, bring it to room temperature and then pop it into the oven at 350 for about 5-10 minutes (if it starts to get too dark, take it out) and you have "fresh" challah all over again.
Enjoy! B'tayavon!


Comments